Growing apples organically – 2017

Growing apples is a bit problematic because they are susceptible to some nasty insect and disease problems. Growing apples organically is even more challenging for the exact same reason. And yet, my husband Bill and I have taken on that very challenge in our home orchard. Why? We love the idea of eating apples that were grown without chemicals.
To grow apples conventionally, orchardists have quite the spray regimen to adhere to every few weeks. As a Master Gardener, I’ve learned about that routine. It’s a little scary thinking about the amount of chemicals you have to use, to produce the “perfect” fruit.
When I went through my Master Gardener training back in 2002, we learned something important. If you’re not going to care for your trees to keep them healthy, don’t grow them. Diseased or insect-infested trees will cause problems for those around you who are trying to grow fruit trees.
We’ve been growing apples organically for several years now. Each year, we learn a little bit more about what works and what doesn’t. Because of that, I thought you might be interested to know what our routine is each growing season.
Remember that you can click on any photo to view a larger image.
One thing I should clarify is that, here in Spokane, WA, we don’t have apple maggot flies (halleluia!). We actually live in a quarantine area. That’s partly to protect the Green Bluff fruit-growing region on the north side of town. But we do have apple codling moths, and they are responsible for the horrid little worms you’ll find in apples. Yuck.
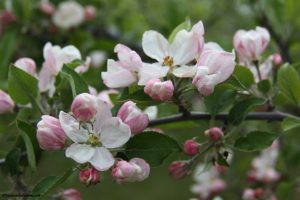
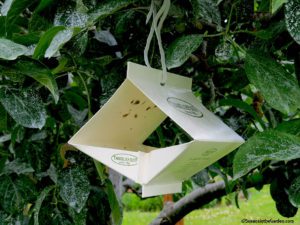
The first time we have to take action is when the apple trees are blooming. Bill purchases and hangs a couple of apple codling moth traps. They contain a pheromone (mating hormone) and are coated with a sticky substance. The purpose of the traps isn’t to kill the moths. Instead, they alert us when the moths are active in the area.
You can see a photo of a trap to the left. If your local garden center doesn’t carry them, do a web search on “apple codling moth trap.“ You’ll find all sorts of sources for them.
Organic spray routine:
When we see they’re active and the trees have finished blooming, Bill starts his spray regimen. He uses either a mixture of kaolin clay powder and water OR a spray containing Spinosad. Or he’ll use a spray containing Bt (Bacillus thuringiensis). Waiting until the trees are done blooming is extremely important. That’s because Spinosad will kill the bees that are pollinating the flowers,. We certainly want to avoid that at all costs.
One of the most common brands of kaolin clay is Surround. There’s a ready-made spray that contains the active ingredient of Spinosad. Just click on that link. You can learn more about Bt by going to this link.
Kaolin clay, Spinosad and Bt are all organic products.
The kaolin clay mixture coats the leaves and developing fruits; scientists believe the film left behind either confuses the codling moths into thinking they’re not on a surface for laying eggs on or it creates a barrier that makes it difficult for the microscopic larvae to penetrate the apple.
Spinosad contains a bacteria that kills the larval form of apple codling moths, cherry fruit flies and a few other insects. Bill doesn’t use it exclusively because scientists have noted that continual use of it can cause the insects to develop a resistance to it.
Bt is a bacterial strain that is harmless to humans but deadly for the larval (caterpillar) stage of insects.
Thinning the apples
For the brief window between when the petals have fallen and it’s time to thin the apples, Bill alternates using the kaolin clay with the Spinosad spray or Bt about every 10 days until the developing apples are large enough to be covered with barriers, which I’ll explain in a moment.
Once the apples are the size of large marbles, it’s time to thin them to about 10-inch spacing. I know, it’s hard to bring yourself to remove all of these apples that you would love to harvest later! But here’s why it’s important:
A tree can only grow so many apples, which all require a lot of moisture and nutrients. And their branches can only support so much weight. If you don’t thin the apples, it’s very likely the tree won’t bear the following year. And if you don’t thin them, you risk having branches break under the weight of all of those extra apples.
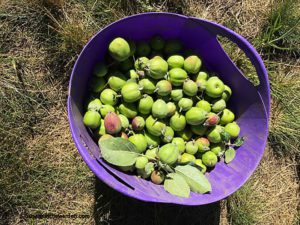
As you can see by the photo to the left, we did a ton of thinning a few days ago! (and actually, there were 3 bushels full of thinned apples when we were done) You’ll notice the apples look a bit larger than the size of large marbles. That’s because we recently went on a 2 1/2-week trip, and the apples were way too small before we left so we decided to cross our fingers and take care of it when we returned home.
I also want to mention how apples, and other fruit trees, go through something called “June drop” each summer. That’s where many fruits will drop to the ground, which is a natural thinning mechanism. Since we had to wait a bit longer to do our thinning and covering of the apples, we found that the June drop had already taken place. That cut down on the amount of thinning and covering we had to do, which was nice.
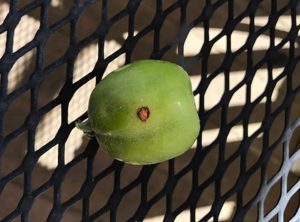
By the way, if you spot any apples with this sort of damage, remove it from the tree and discard it in your trash. Do not leave them on the ground and do not compost them. There is a worm inside the apple in the photo and you don’t want it anywhere in your yard!
OK, now let’s talk about covering the apples:
Through research and experimentation, we’ve learned that in order to have the most worm-free apples, we need to use the kaolin clay and cover the apples with apple maggot barriers. Those barriers help keep the kaolin clay on the apples and increase its effectiveness. It definitely creates an un-apple-like surface to fool the moth and holds more of the clay on the apple to thwart the larvae. (a few years ago, we skipped using the barriers and only used kaolin clay but had significantly more codling moth damage as a result)
We call them “footies” because they look just like the little nylon footies we ladies slip on our feet before trying on shoes at a shoe store. If you click on the link above, you’ll see sources for them. We typically purchase ours from maggotbarriers.com or seattletreefruitsociety.com.
After you have thinned the young apples, it’s time to slip a barrier over each one. To do that, gently open the non-sewn end of the footie, slip it all the way over the fruit up to the stem, and gently twist the excess fabric on the stem end around the stem (easier done than describing!).
Once all the footies are in place, Bill sprays a fresh layer of the kaolin clay and water mixture onto the footie-covered apples and the tree leaves.
From that point on, Bill just uses the kaolin clay and water mixture on the trees about every 3 to 4 weeks or after a heavy rain.
To keep your fruit trees healthy, water them regularly and check on them regularly as well, to spot any potential problems.
I know this all sounds like a lot of work, but we’ve found it to be so worth it. The most tedious stages are the thinning and covering of the young apples. That process takes us a few hours. I know a lot of folks probably think we’re nuts to go to that trouble but here’s how I look at it:
In this day and age, we have so many time-saving devices. Surely we can spend a few of those “saved” hours at the beginning of the season so we know our fruit is chemical-free!

